Yes I know that supposedly the iPad is not really a good content creation device. That is is said not to be good at doing real work like on a real computer…. Supposedly!
On the other hand, in my eyes the so called ‘real computers’ are more or less on their way out. Yes, I’m convinced of that!
(Sorry for the macabre example, but I happen to like that one…)
Of course working with the iPad means relearning a lot of things. It means finding new ways to do something. Sometimes even easier ways. But not always….
The goal I have set myself is to get a film photographer’s workflow going on the iPad.
With digital it’s quite straightforward. Lots of apps, from Apple’s own Photos to Lightroom Mobile make digital life easy. Import your photos and start working on them….
Not so easy with film! I’ll have to find a way to ‘scan’ my negatives properly. Of course, a film scanner does not work with an iPad. So there has to be another way.
I’ll have to use my digital camera to scan the negatives. With the added benefit that the so called scanning will be much much faster than on my Plustek scanner. But will it be good?
Well, let’s do a test. I set up my test rig on the living room table. I know it will be better with a stable repro stand for the camera and a proper macro lens.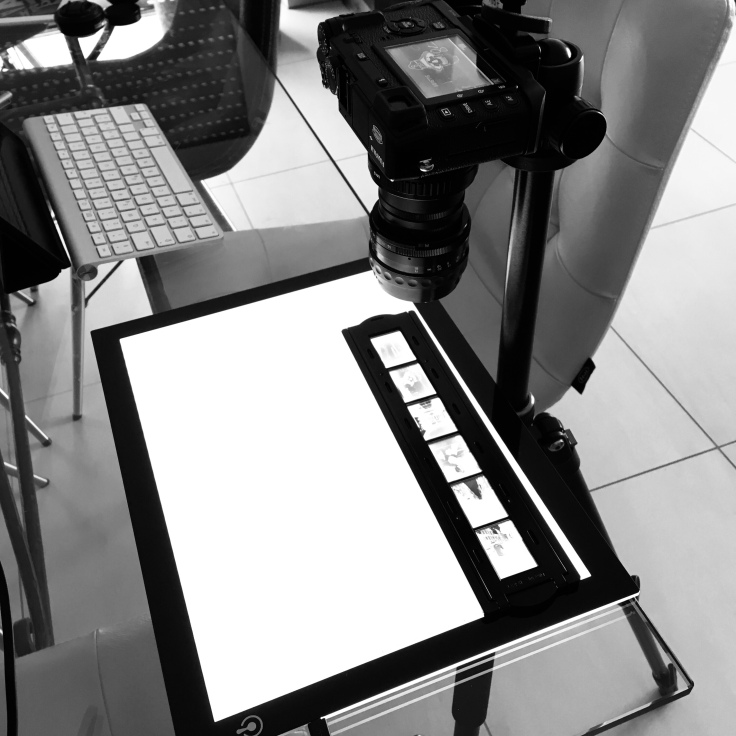
Bummer is I got none… so I use my sharpest lens, the Revuenon 55mm f:1.7 with extension rings to fill the frame with a negative.
And I need a light source. That one’s easy, I have a cheap USB powered light pad from HUION I got on Amazon. I normally use it as a light table, works like a charm.
Of course I have not bothered with stuff like darkening the room to get better contrast or masking the unused part of the light table to minimize stray light. If this setup works somewhat I’ll do it better next time.
First, it was quite fiddly to find out which extension rings to use, to focus correctly, to get the stuff set up in a way that works. Once it’s done I’ll be able to recreate the setup quite quickly.
At first I released the shutter by hand with the result of nice motion blur. Then I switchet to the 2 second self-timer. No more motion blur!
The lens setup looks a bit….. otherworldly though.
But it works! That’s the point. And it works fast. Once set up I ‘scanned’ a 6 negatives strip in about 30 seconds. Including careful repositioning of the negative carrier. Much faster that the scanner that takes about 90 seconds PER NEGATIVE!
OK, so now I got the negatives on the SD card. Great! But I don’t have one of those card reader dongles for the iPad. For this step I’ll have to make a detour to the Mac, load the photos into the Photos app. The’ll be automatically sent to the iPad tough. Thanks to Apple’s Cloud!
Negatives! That’s the key word! I’ll have to invert them somehow. I know why I started with a black and white film. I don’t want to bother with color correction just yet.
I’ve searched for an app (there’s certainly one for it!) and found Snapseed. In fact the curves tool in Snapseed, a free software which is a very great advantage, is easy to use and gives me a usable starting point.
A little more tweaking in Snapseed and Photos (still have to see which one I’ll use finally) and I achieve this nice result:
Looks sharp enough, contrast is nice, just as I like it. Let’s compare it to the original scanned version from the Plustek Opticfilm 8100, a very good scanner:
To my eyes, apart from obvious differences from processing the photo, the result is as sharp and detailed as the scanned version. It looks grainier, but that might result from a more agressive use of the Clarity slider. I’ll have to play around with Snapseed some more. In fact the uncompressed files on my screen look very good. I think with a real macro lens instead of the awful contraption I used, I’ll get even better results. There must be a reason why they sell macro lenses!
What I need to do now is to find a setup that allows a quick setup of my gear, buy a nice M42 or Fuji macro lens and some light blocking stuff. And perhaps there’s some app out there that makes the conversion easier… I’ll log some Google time.
Why I do this you ask?
Well…. just because I can! I like tinkering with stuff and find new ways to do something. As my Mac, a venerable 2012 Mac Mini, will reach it’s best before date soon I’ll have to see where I’ll go from here. Tried Windows and Linux and I hate them, sorry. Macs are crazy expensive nowadays, so that leaves the iPad way open to me… a promising way I’ll follow a bit further.
I’ll keep you updated over the next weeks with my progress…. or failure. 😉
If you want to chime in with comments, advice or even incomprehensive headshaking, you’re very welcome.
Thanks for reading!

I’ll be watching this little project with great interest! The line ‘Well…. just because I can! I like tinkering with stuff and find new ways to do something’ pretty much sums me up too and although my first generation iPad Mini is on its last legs I’m planning on replacing it as soon as possible with a more modern example with more storage space… Good luck!
LikeLiked by 1 person
Thanks! Will keep you updated!
LikeLike
Is that a tripod or a copy stand. Details?
LikeLiked by 1 person
Cheap tripod, about 35€ on Amazon. I’d like to find a repro stand
LikeLike
Frank, if it works and your happy, use it!
I purchased a Epson Perfection V550 Photo scanner last year, and a great piece of kit. The downside is it can be a bit slow on workflow. But it does do exactly what it says on the tin, so I’m happy with the Epson.
LikeLiked by 1 person
There’s a camera lens attachment you can get to put slides and negatives in. You could maybe use the iPad or an iPhone to provide the backlight as well.
LikeLiked by 1 person
iPad as backlight is it so good as the screen shows pixels. You have to build a contraption to hold the negatives at a distance so the pixels are outside the focus zone.
As for the slide copy adapters, most have a crappy lens inside and it’s difficult to get the framing right as the tube has a fixed length….
I prefer the LED panel I use, nice uniform lighting.
LikeLike
One might try sandwich paper or even something thinner to blur the pixels.
LikeLiked by 1 person
A small clear sheet of white opaque perspex or tracing paper should remove the pixels, but you’ve got your light source…
How about experimenting with a cheapo slide copier, take the lens out and using a point-and-shoot camera in macro mode? 🙂 Any required extensions could be achieved with ring adapters. Or experiment with a cardboard tube until you get the right length. It was the fact of the slide holder as an attachment I was thinking about.
LikeLiked by 1 person
A p&s camera won’t work as the ‘macro’ setting is normally achieved at 28mm or other widest focal length and that gives a strong distortion of the negative.
I’ll build something to shield the lens and negative from light
LikeLike
man, shooting on analog and processing with all the digital devices and apps…is is smart? does it make sense?
LikeLiked by 1 person
No!
I’d love to set up a real darkroom! But I don’t have the space and the time, sadly. So I must go for second best.
My joy lies in shooting film with it’s challenges and limitations and the great cameras.
Makes no sense, that’s quite sure. But it’s what makes me smile!
LikeLiked by 1 person
ok i undestand 🙂
LikeLiked by 1 person
I’m ignorant on this, are DSLRs WiFi capable? My Fuji is ancient, ie. five years old, but my little Canon has WiFi. I’ve been able to connect the iPad to the camera and move files that way.
I too miss my darkroom. But it’s just not do-able now.
LikeLiked by 1 person
Most modern digital cameras have WiFi…. but they don’t really interest me.
I like film and film cameras. Alas a real Darkroom is impossible for the moment for me but it’s doable! I did it and it works!
LikeLiked by 1 person
Very interesting Frank, not so much the scanning of negatives (for me personally) but the fact that you’re looking at other digital and online options. My next post is precisely about this!
What is not working with your MacMini?
LikeLiked by 1 person
It’s working fine. I just want to future proof my setup when it will finally be unable to do the job and I don’t have the crazy amount of money they ask for a MacBook Pro now… As I said Windows is not an option..
And I like to think I need to slim down my computer gear.
…and I like to tinker with stuff
LikeLiked by 1 person
I have been working towards migrating my film photo work to an iPad since I first heard that Serif was developing a version of Affinity Photo for the iPad. I “scan” my negatives with my wife’s Fuji X-T20 using a Fuji app to control the camera and transfer the files to Apple Photos on my iPhone. The next challenge is to find a way to emulate Epson’s ABW which is not supported by their IOS print drivers. I want to make warm tone inkjet prints with pigment ink on heavy fine art paper, as I do now with my OSX setup.
LikeLiked by 1 person
Good to hear I’m not alone with this crazy idea! Since I tested with b&w white balance is not yet a priority.
What’s your experience with resolution vs a good film scanner?
I tried Snapseed to invert the negatives and later found that Photoshop mobile has that posssibility too. Have to try Affinity but it’s a paid app.
I have some doubts about printing. Not many options when printing from iOS….
Any hints are very welcome!
LikeLike
The resolution of my 35mm B&W negative scans done with a Schneider Componon enlarging lens on a Fuji X-T20 is much much better than that of my old Epson V700 scans and, to my eye anyway, noticeably better than my more recent Plustek 8100 scans.
All of my film work is B&W so no orange mask to deal with, but I am still not happy with my efforts to make warm tone prints.
I have not bought either an iPad or an AirPrint compatible printer yet. My current IOS print process uses Apple Photos on my iPhone, an Epson R2880 printer and my iMac working as a print server.
LikeLiked by 1 person
Good idea with the enlarging lens! Better and cheaper than a macro lens I guess.
I use a Plustek 8100 too and was happy with the quality but not with the speed.
My trials are looking good so far
LikeLike
Forgot to mention that I use Affinity Photo working as a Photos extension on the iMac to invert my scans. I have no idea how well this workflow will migrate to IOS.
LikeLiked by 1 person
Thanks a lot for your input, Doug
LikeLike
Nice article. I’ve been doing almost the same thing, though I get around moving the pictures from camera to ipad by using a phone instead of a camera then uploading to dropbox. I’m still experimenting with both the iPhone and Samsung S7. Both AffinityPhoto and Photoshop Express have ‘invert’ filters, then I finish up in Snapseed. My results are a bit lacking at the moment but I’ll keep plugging away 😀.
LikeLiked by 1 person
Takes time to get the hang of it. Slowly getting there though
LikeLiked by 1 person